Showing posts with label crafts. Show all posts

Thursday, May 26, 2011

Welcome Summer!!

I saw this on a a photography blog. Isn't this adorable?! So bright and summery, full of fun things you can do with your kids this summer.
You can download it here

Tomorrow is the last day of school! It's a day of class parties, pictures, goodbyes and a teacher/staff luncheon I'm putting together for FPAC. I've enjoyed my 2 years but it's time to say goodbye. Bath and Body Works...I love this place. I went here to get all the teachers a little gift. The girl helping me gave me the bags and the ribbon to go with the lotion, awesome! I made the tags before I got the lotions and I was so happy to find these with the bright summer colors. I've included a tag without the love, FPAC in case you need a gift idea for your teachers :)


Wednesday, March 30, 2011

DIY Burlap wreath

I found this wreath tutorial on tatertots and jello and just HAD to make it. I only purchased the styrofoam wreath and burlap, the goal was to use supplies I already had. I didn't have the Scrabble tiles so I went on a treasure hunt in my craft closet and found this little frame. I spray painted it and made a digital picture for the inside. (I used the Echo Park digital kit called A Walk in the Park.)

Wednesday, February 23, 2011

After School craft class

Today was our last craft class. It was a lot of fun and these kids are just too cute. They told me that they wanted me to do craft class everyday. (It has nothing to do with the fact that I was with them for only an hour one day a week, we were making fun things and I let them push the buttons on the Cricut machine :)
They were really well-behaved kids...I just may do it again next year :)

Thursday, February 10, 2011

after school craft class

This month, I'm teaching a craft class at the school. This week, we made little Valentine card people. Pipe cleaners, some playing cards and googly eyes...


The kids had fun making them. The 2 boys in our class were sick this week :(


Monday, January 17, 2011

Valentine wreath

I saw this wreath on a blog called The Idea Room and fell in love with it! (What is it with me and wreaths?) It's a pretty easy and inexpensive project and one that Paige and I could do together.

You need: straight pins, 1 1/2 yards felt, 3 inch circle template (i used a mug) and a styrofoam heart. (I had a hard time finding this, eventually found one at Hobby Lobby for $3)

trace your circles on the felt and cut them out. I didn't count but you need quite a few circles, you want it nice and full (I cut them out while catching up on my recorded shows)

Next, you fold the circle in half and then fold it again. Place a pin at the point and then into the heart.
Just continue the process on the top, inside and outside of the heart...
Next, pin a loop of ribbon on the back and you're done! (I'm going to change the ribbon, I'm not feeling the pink one I have on there. )
If you decide to make one, I'd love to see pictures!
A pink one would be cute too :)


Thursday, November 11, 2010

a couple of simple crafts/gift ideas

Tonight, we're having a Relief Society meeting about low cost Christmas gift ideas. I thought I'd share these with you.
First little craft are tile coasters. You need:
-clear acrylic spray (I like the Matte finish)
-Mod Podge. (I always call it Modge Podge. I'm a redneck, I say everything wrong ;)
-foam brushes
-felt pads
-tiles. These were 14 cents at Home Depot
-Scrapbook paper scraps or photos
First, cut and measure your paper to fit the tiles. These tiles are 4.25 x 4.25" so I cut my paper to 4" squares.
Next, clean and dry your tiles. After they are dry, apply a thin coat of Mod Podge to the tile and place the paper on top. Make sure to smooth out all bubbles. Allow this to dry for about 15 minutes.

Take your tiles outside and apply 2 or 3 coats of acrylic spray. After they're dry just stick the felt pads on the bottom- one on each corner.

I used Zoe Pearn's Bloom and Grow kit
I used my digital stuff to create the papers for my tiles. I just made 4" squared documents in PS Elements, added pictures and elements then printed it out on photo project paper. (this paper makes your colors more vibrant than copy paper)
I used
Shabby Princess Clementine kit
Ali Edwards
brushes
Another idea is Family Home Evening in a jar. You can download a list of FHE lesson ideas, print and cut and put them in the jar. You've got lessons ready to go!
Here's the link to the printables


Thursday, September 16, 2010

fall wreath project

I came across a craft idea from this blog today. I've been looking for a fall wreath for our front door but I didn't want to spend a lot of money. All the materials came from the Dollar Tree and I spent a total of $11! Here's what I got:
9 of these (2 for $1)

5 of these leaf bunches and a string of leaf garland. I also picked up this 18 inch wreath. I just pulled the leaves off, got out the glue gun and went to town!

This is the finished product. I love fall!

Tuesday, August 24, 2010

lunch box notes

I've told you before how much I love little lunch box notes. I found these on a fun little blog and thought they were adorable. You just print, cut and you're ready to go. It's such a small thing but I've noticed how much my kids love getting them, especially if they have a test or if they need a little boost of encouragement. Speaking of notes, Paige made this card for Aaron and I about a week ago and yes, I bawled my eyes out...


Thursday, February 11, 2010

this years Valentine's

I like Valentine's Day. I like any holiday where there is candy involved. (that's pretty much all of them)
I found these Valentine cards here.(Thanks for the link Karin) I just love them! I went into Photoshop and added their names, cut them out and rounded the edges with my Corner Chomper (thanks AJ, I love it!) The kids wanted to give out salt water taffy...cinnamon taffy is the best!
I'm so glad to have all the evil candy out of my house...it's for the best

Sunday, December 28, 2008

our new Christmas tradition


I've been meaning to post this idea for a while now and I just didn't get around to it. I love Christmas advent calendars. I wanted to create one that would be meaningful, inexpensive and wouldn't take a lot of time. (I love to sew but I didn't want to get into a project right before Christmas)
So I searched online for some ideas and came across this idea from Martha Stewart. I changed some things here and there and I'm happy with the way it turned out.
I bought 12 pairs of baby Christmas socks, put numbers on them and hung them on a ribbon, that's it!
Aaron and I wrote things that we love about each of our kids. It worked out great because they each got 8 turns each so we had no fights there. We put all the little cards in a Christmas tin under our tree and I will put them in our Christmas journal to keep. You could put scriptures, stories, candy, activities for each day in December to do as a family...lots of ideas. You can do something different each year if you wanted to. I'm looking forward to this new Christmas tradition!
Materials I used:
-the numbers are digital brushes from Ali Edwards that you can find at designerdigitals.com.
-the ribbon is red and green polka dot May Arts ribbon
-I used those Contact hanger things from 3M so I wouldn't have nail holes
-I got the socks from Old Navy. They range in sizes from 6 months to 3-6 years. You could do a mix of kid and adult socks as well. Now that Christmas is over, you could score some good deals right now for next year.
-I thought about using mini clothespins to hang the socks but I just used some mini bulldog clips I already had. These are Tim Holtz ones I got at the scrapbook store but you can get these at Staples.
-I downloaded the "What I love about you" cards for free from Oprah.com. You could make your own in Photoshop as well, that would be really cute! I just stamped the B, P and H on there.


Thursday, December 4, 2008

teacher gift idea

I was browsing all my favorite digital scrapbooking websites last night and came across a really cute Christmas gift idea for teachers. The great thing about it is you can personalize it with whatever you want and it doesn't cost a lot of money. (and come on, who doesn't love chocolate?! After dealing with our children 5 days a week, these nice people deserve a treat and then some)

You can download this for FREE here

One of B&P's favorite things to do at Christmas is to make their own handmade cards and letters for their teachers so we'll include those with the chocolate. I wonder if their teachers enjoy Diet Coke as much as I do...I need to look into that...


Tuesday, November 18, 2008

a fun Thanksgiving craft

Thanksgiving is right around the corner! I'm so ready for my favorite Thanksgiving dish, Frog Eye Salad. (It always tastes better when my Mom makes it :)

I wanted to share a fun craft that I’m working on for the big day. I got this idea from the November issue of Parents magazine.

Instructions:
-Cut a 1-inch sliver off the bottom of a 9-inch polystyrene ball. (I found an 8 inch one in the craft section at Walmart for around $8.)

-Wrap sphere neatly in thick dark-brown yarn, covering surface completely; knot on bottom.
-Make a 4-inch ball from light-brown yarn and attach to body with a wooden craft stick.
-Create simple facial features using felt: white circles (approximately the size of a quarter, with 1/8-inch pom-poms for pupils) for eyes, yellow triangles for the beak, and long red felt teardrops as the wattle. (I'm just using googly eyes and scraps that I have on hand)
-Cut feather shapes from colored craft paper (or old scrapbook paper you’re not using anymore)and bend in half lengthwise to create seam.
-Have the kids write or draw things that they are thankful for
-Glue wooden craft stick to the bottom third of the feather and insert in a fan shape on turkey body.

Sunday, August 17, 2008

photo album for Linda


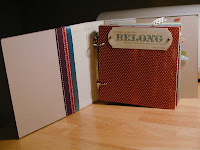
Just wanted to share a little book I made for my aunt Linda's birthday. It's a little 6x6 album so she can put pictures of her grandkids inside and Uncle Mike can enjoy it too:) Hope they like it...


The "d" on the front was cut by the Cricut. I cut 4 of them and glued them together. It makes it look like chipboard, I learned this little trick from 2peas.

On the last page, I used one of my favorite stamps. It says: "Life is a great bundle of little things." so true...

I love making mini albums, they're a lot of fun. Just wanted to share it with you in case you're looking for an idea!


Saturday, March 1, 2008

my dollar store find


I made this little book for Allison, she was one of my Achievement day girls and she's babysitting the kids tonight. I called her yesterday ( short notice) and not only did she say yes but she said, "I'd love to." How adorable is that?! She's a sweetheart.


I got this little 6x6 album at the dollar store last summer. I just used some paper from my stash, stamped a few of the pages so she could journal, tied on some ribbon and that's it! I used my Cricut (Base Camp) to cut out her name. The little dot on the "i" I've had in my stash for a while, it worked out great.


Just wanted to share this with you in case you're looking for a gift idea or want to make one for yourself. I'm always on the lookout for fun, easy and fast projects. I've been on a crafty roll the past 2 days...Aaron's home from China so he can help with the kids. yeah!


Wednesday, February 13, 2008

Valentine's Day projects

Hi there-
Just wanted to share a little accordian album I put together for Valentine's day. I'm going to include the little notes and Valentine's from the kids on the back. Just a fun little happy project...


Last week for Family Home Evening, we put together some "Love Sacks" for each person in our family. We've been writing notes and kind things this week to each other and putting them in each other's sacks. A simple thing that I think will become a new Valentine tradition for us.
Happy Valentine's Day!


I love you Aaron :)


Sunday, December 23, 2007

family Christmas journal


If I don't post the pictures now, I probably won't get around to it. I've had this chipboard book sitting in my closet for 3 years so I just painted it with some green acrylic paint I had. I used my Cricut to cut the "H" and the star. Rubons are Daisy D's and the other stuff is Making Memories. I stamped our names on the cover but it didn't work. I will add that today.I added tabs on the side for each year (the book will hold 10 years of stuff) Simple and fun...we will write in it tomorrow. Merry Christmas!

Tuesday, November 27, 2007

gettin' crafty

I live for crafts...and I've seen some really cute Christmas ones this year. I saw this one in my Dec. issue of Parent's magazine and I wanted to share it with you all.


I used a 14 inch styrofoam wreath form. I cut 12- 4 1/2 inch circles (used my Cricut for these). Then I cut my black and white pictures just a little smaller than my circles. I glued the circles on with Alene's tacky glue. I tied some ribbon in bows (some of the ribbon I tied little jingle bells on) to fill in here and there. And there you go!


Easy, cheap and cute!

If you decide to get crafty and make one for yourself, I would LOVE to see it!

Enjoy!